
![How to Schedule Posts on LinkedIn – Complete Guide [2026]](/_next/image/?url=https%3A%2F%2Fstatic.carousify.com%2Fblogs%2F697b3bc8b63bab56cb864b3d%2Fthumbnail%2F1769688765173.jpg&w=3840&q=75)
Let me be honest with you – if you're serious about growing your LinkedIn presence, consistency is everything. But here's the problem: posting at the right time every single day feels like a full-time job!
I remember when I first started taking LinkedIn seriously, I'd set reminders on my phone to post during peak hours. Sometimes I'd be in meetings, sometimes I'd forget, and my content calendar would fall apart. It was frustrating, to say the least.
The good news? LinkedIn has a native scheduling feature that lets you plan your posts in advance and publish them automatically at the perfect time. While this feature has been around for a while, surprisingly, most people still don't know about it or aren't using it to its full potential. No more scrambling to post while you're having lunch or missing your optimal posting window because you're in a client meeting!
Why You Need to Schedule Your LinkedIn Posts
If you're still posting manually whenever you remember, you're leaving engagement on the table.
Here's the thing – your audience is most active during specific hours (typically weekday mornings and lunch hours). If you're posting at random times, you're missing out on maximum visibility. Scheduling solves this problem by letting you batch-create content when you have time and publish it when your audience is most active.
Beyond timing, scheduling helps you maintain consistency – the secret sauce of LinkedIn success. When your connections see you posting regularly, you build trust and authority in your niche. Plus, you can plan your content strategy weeks in advance, ensuring you never run out of ideas or miss important industry events.
Bottom line: Scheduling posts isn't just convenient – it's a strategic advantage that separates casual LinkedIn users from serious personal brand builders!
How to Schedule Posts on LinkedIn (Step-by-Step Guide)
LinkedIn's native scheduling feature is available on both desktop and mobile. Let me walk you through both methods so you can choose what works best for your workflow.
Method 1: Scheduling Posts on Desktop
Step 1: Start Creating Your Post
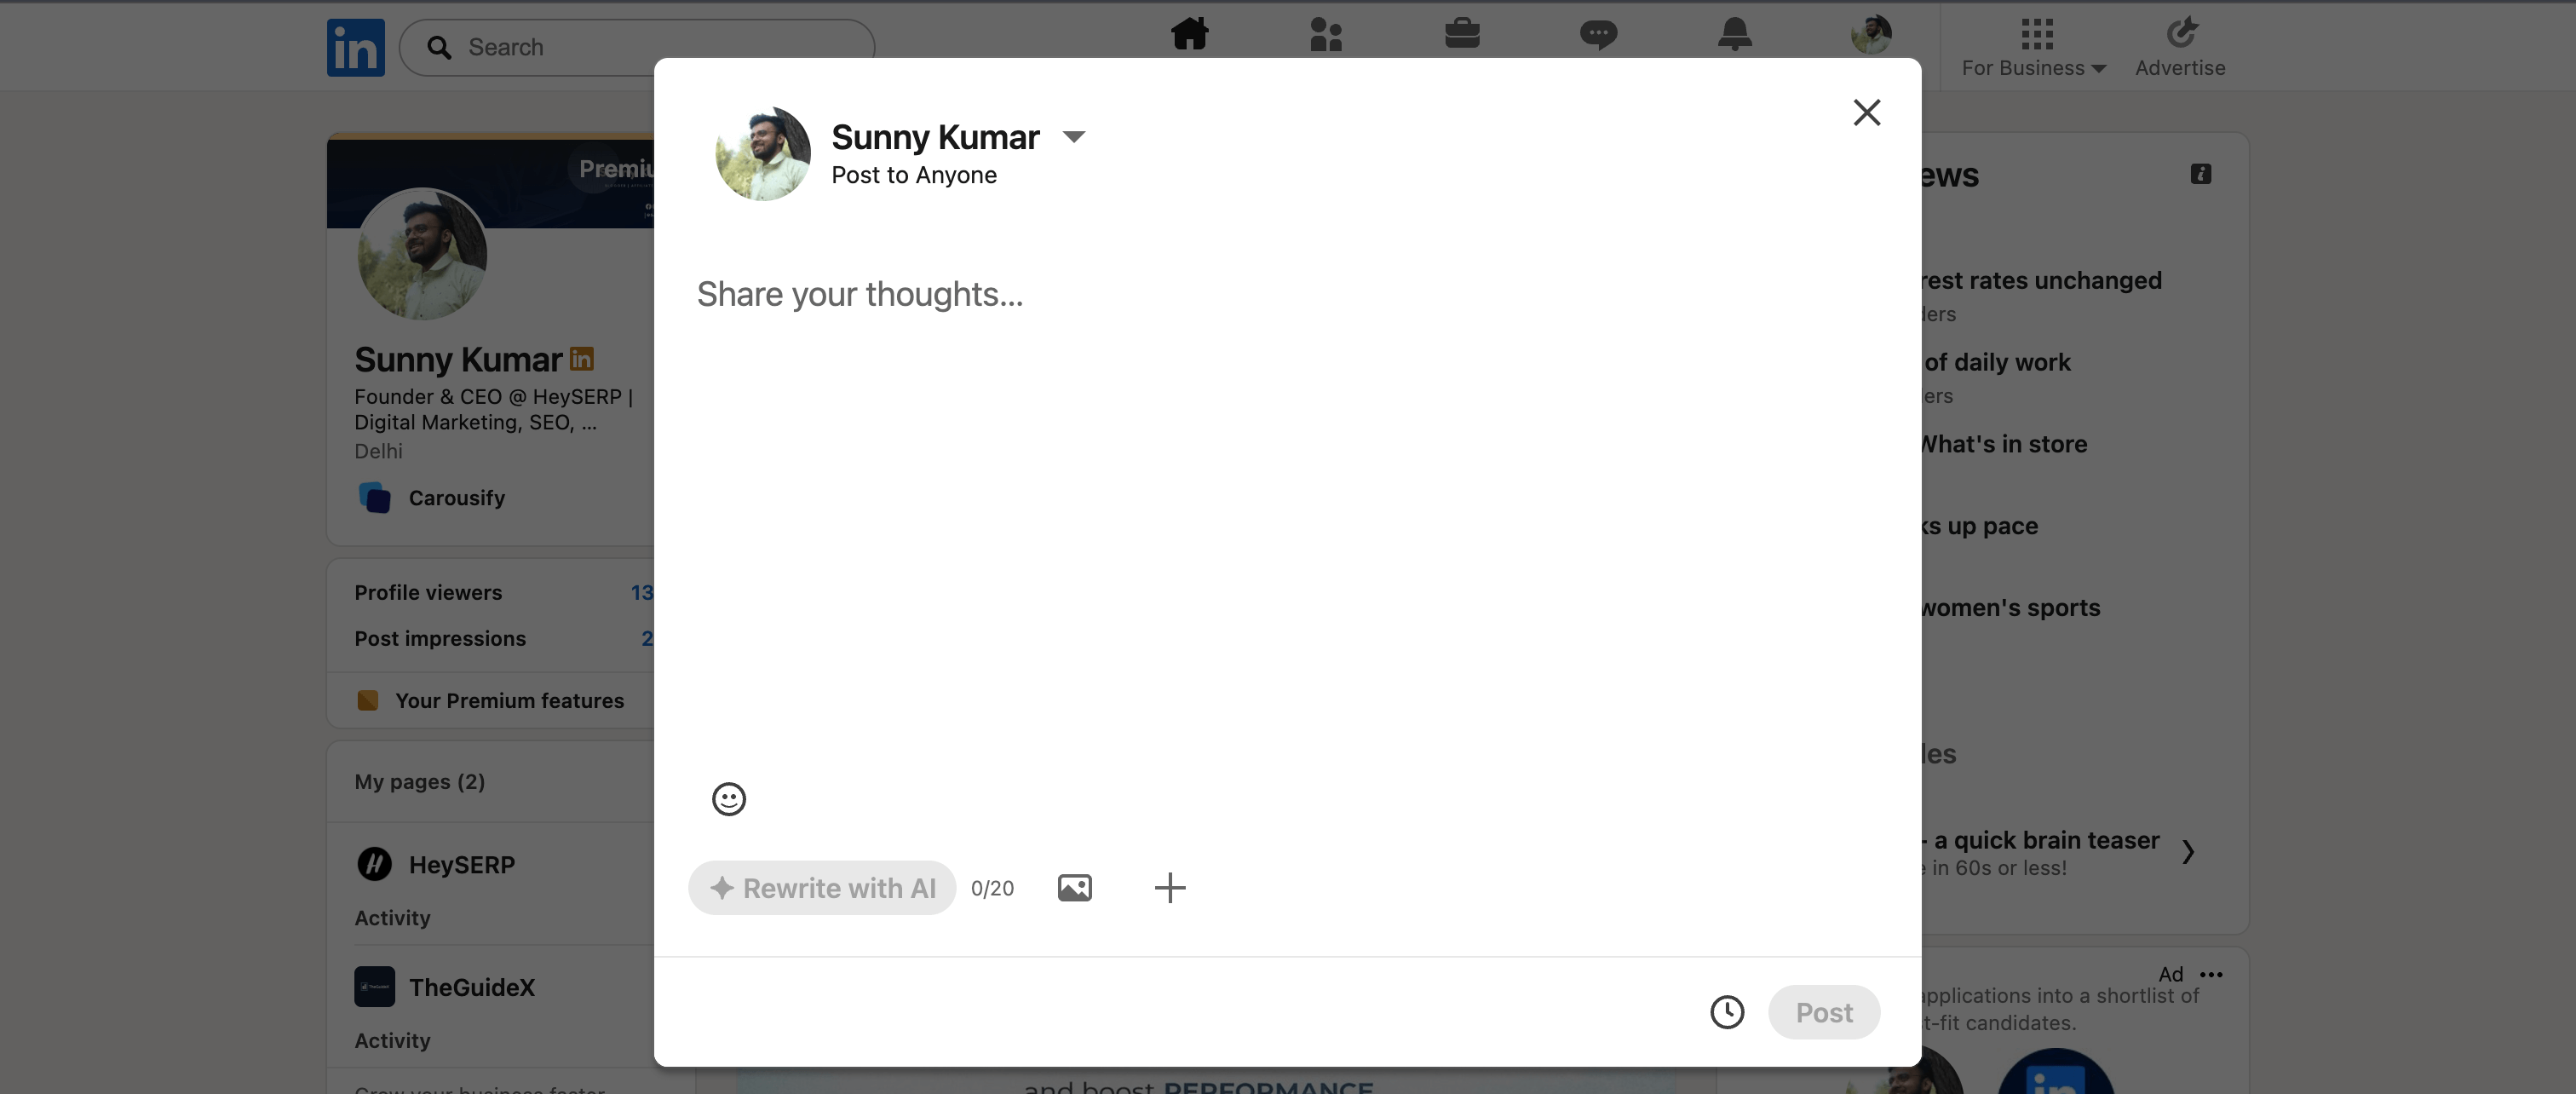
Click "Start a post" at the top of your LinkedIn homepage. The familiar post creation window will pop up, ready for your content.
Step 2: Write Your Content
Type your post in the "What do you want to talk about?" field. Add your text, images, documents, videos, or any media you want to include – just like you normally would when posting immediately.
Pro tip: I always write my posts in a separate document first, then paste them into LinkedIn. This way I can edit without worrying about accidentally closing the window!
Step 3: Click the Clock Icon
Look for the 🕐 Clock icon in the lower-right corner of the post creation window. This is your gateway to scheduling magic!
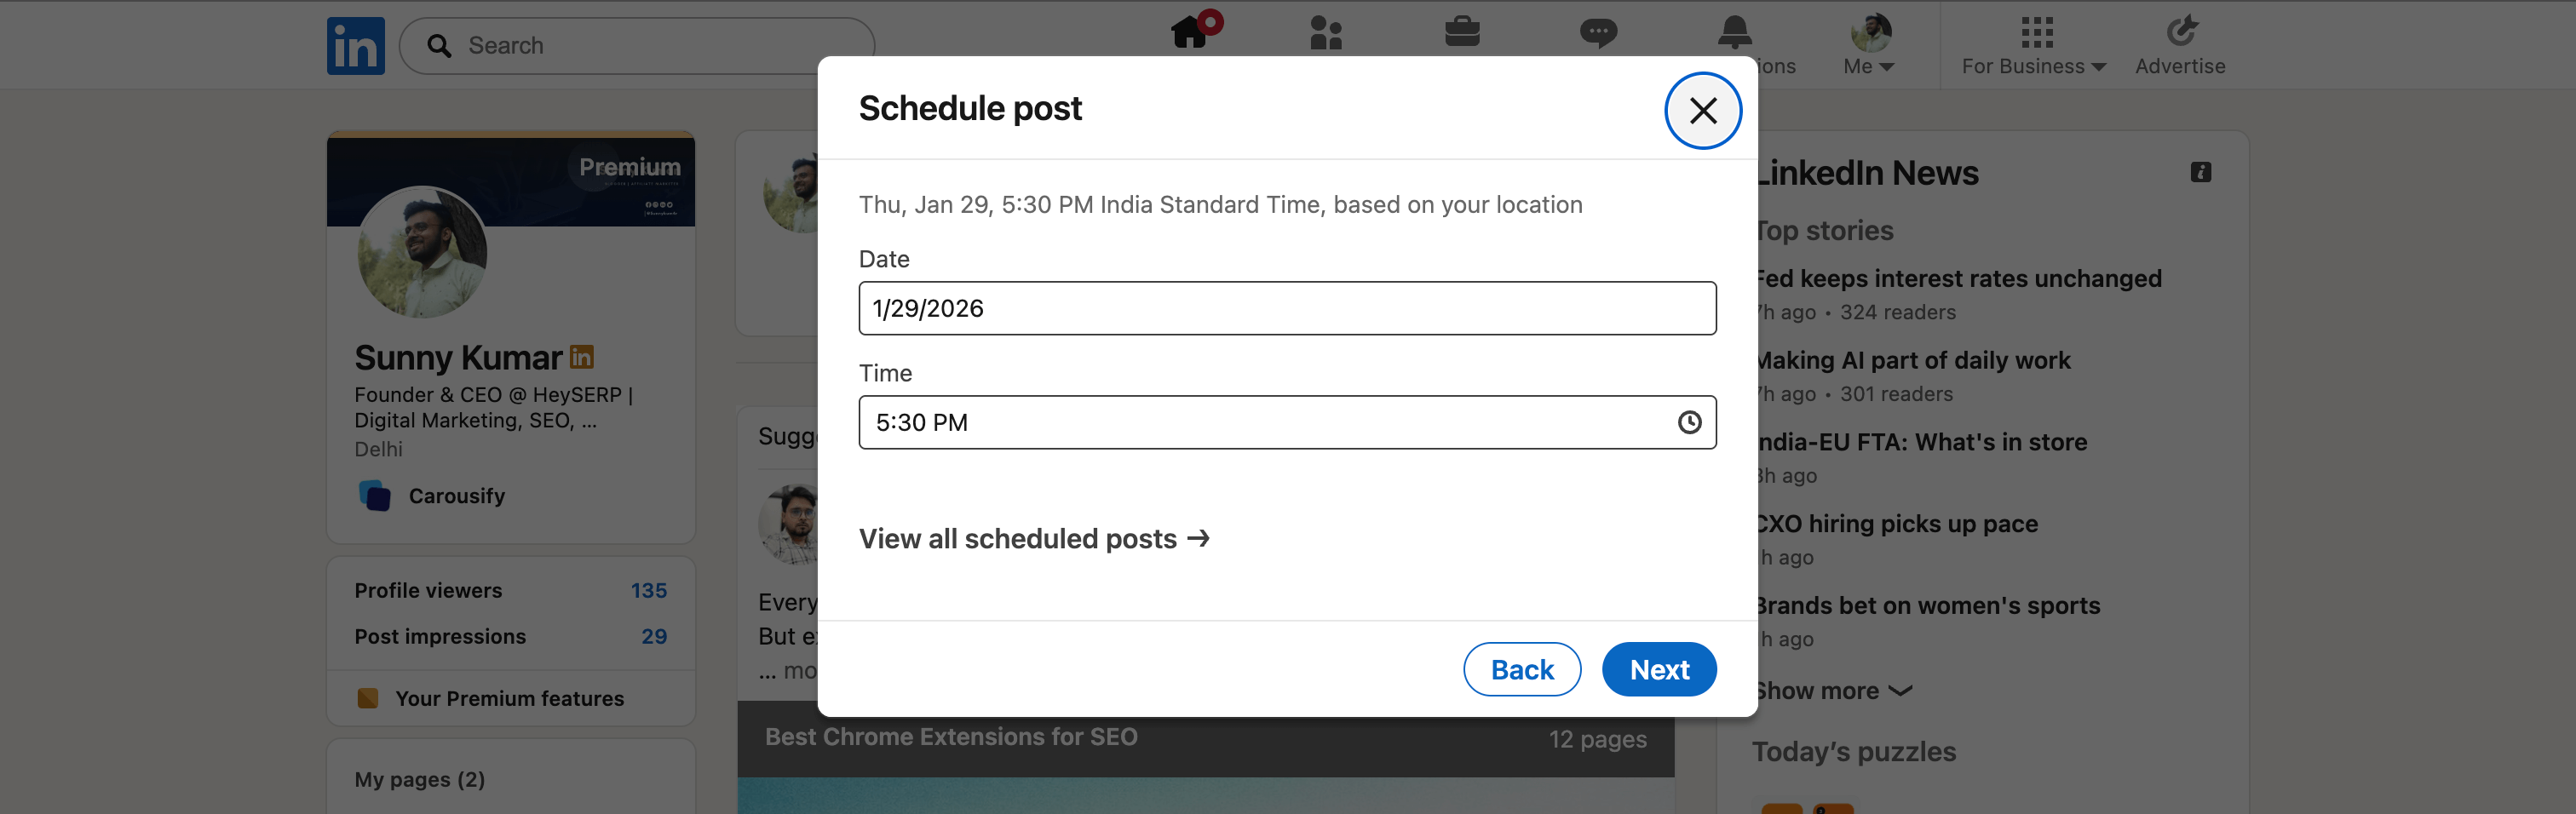
Step 4: Select Your Date and Time
In the "Schedule post" pop-up window, choose when you want your post to go live. You can schedule anywhere from 10 minutes to 3 months in advance.
Here's what you need to know:
- You can use the 30-minute increment dropdown for quick selection
- Or enter an exact time if you want more precision
- The time is based on your device's time zone and standardized in UTC
Important note: LinkedIn won't let you schedule posts with Events, Jobs, or Services attached. If you try, you'll get an error message. Either post immediately or remove the unsupported content type.
Step 5: Click Next
After selecting your date and time, click "Next". You'll see the scheduled date and time displayed above your post for confirmation.
Step 6: Click Schedule
Hit the "Schedule" button to confirm. A confirmation pop-up will appear in the lower-left corner of your screen, letting you know your post is queued up and ready to go!
That's it! Your post is now scheduled and will publish automatically at your chosen time.
Method 2: Scheduling Posts on Mobile
The mobile process is almost identical, with just a few interface differences:
Step 1: Tap Post
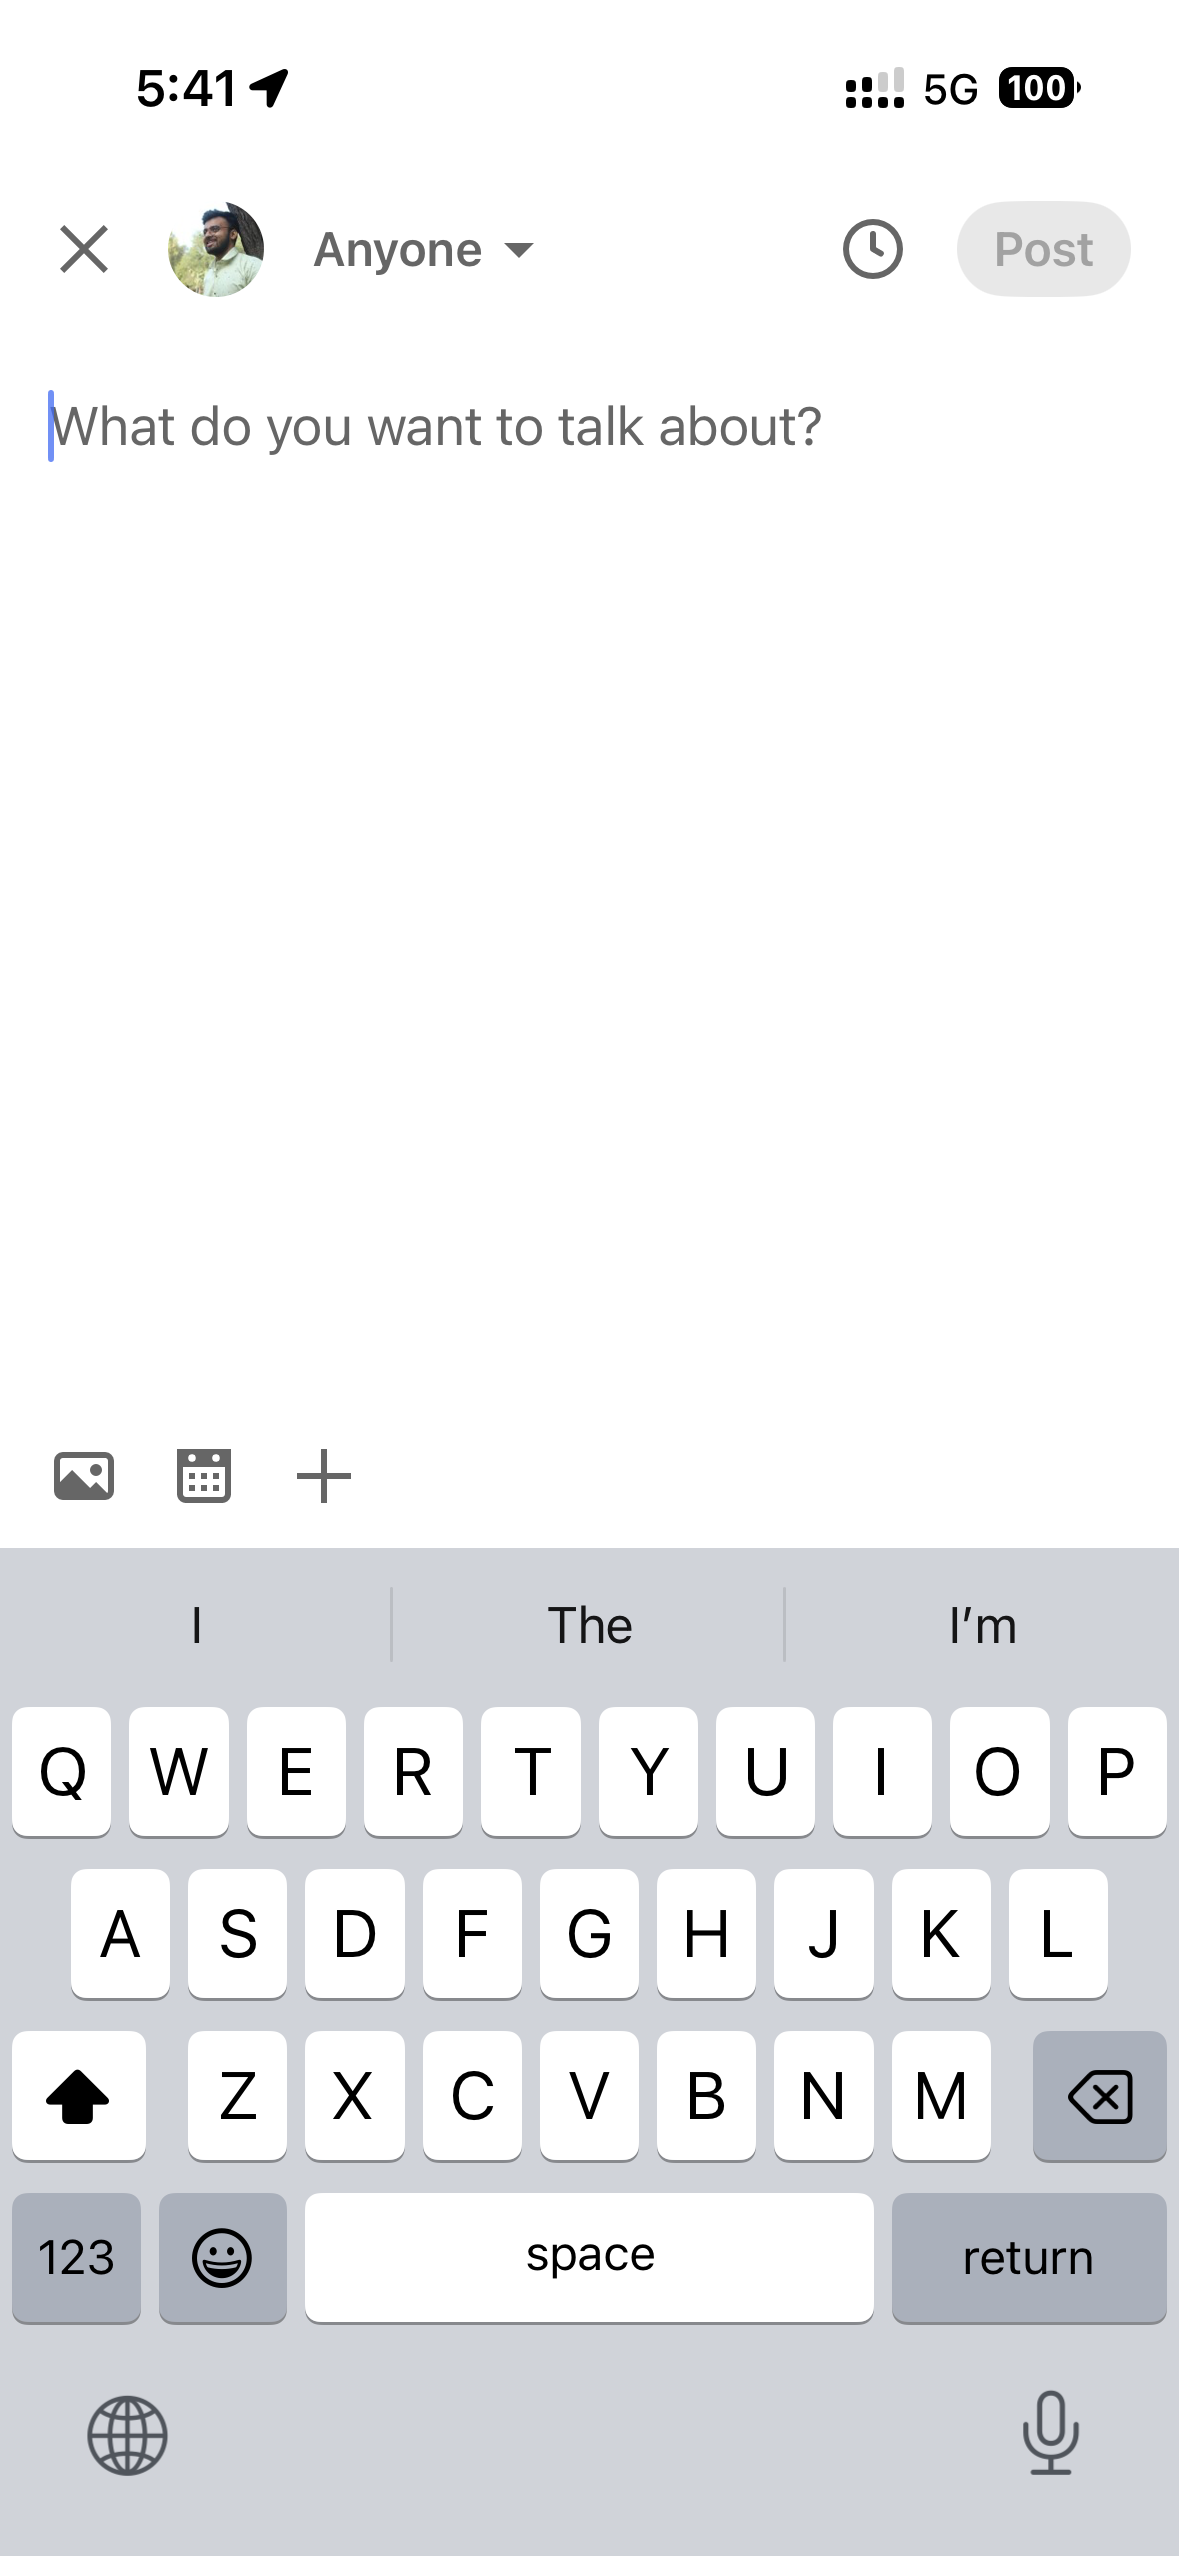
Tap the "Post" button in the navigation bar at the bottom of your LinkedIn app. The "Share post" window will appear.
Step 2: Write Your Content
Enter your post content in the "What do you want to talk about?" field. Add images, videos, or documents as needed.
Step 3: Tap the Clock Icon
Tap the 🕐 Clock icon in the upper-right corner (note: it's in a different location than desktop!).
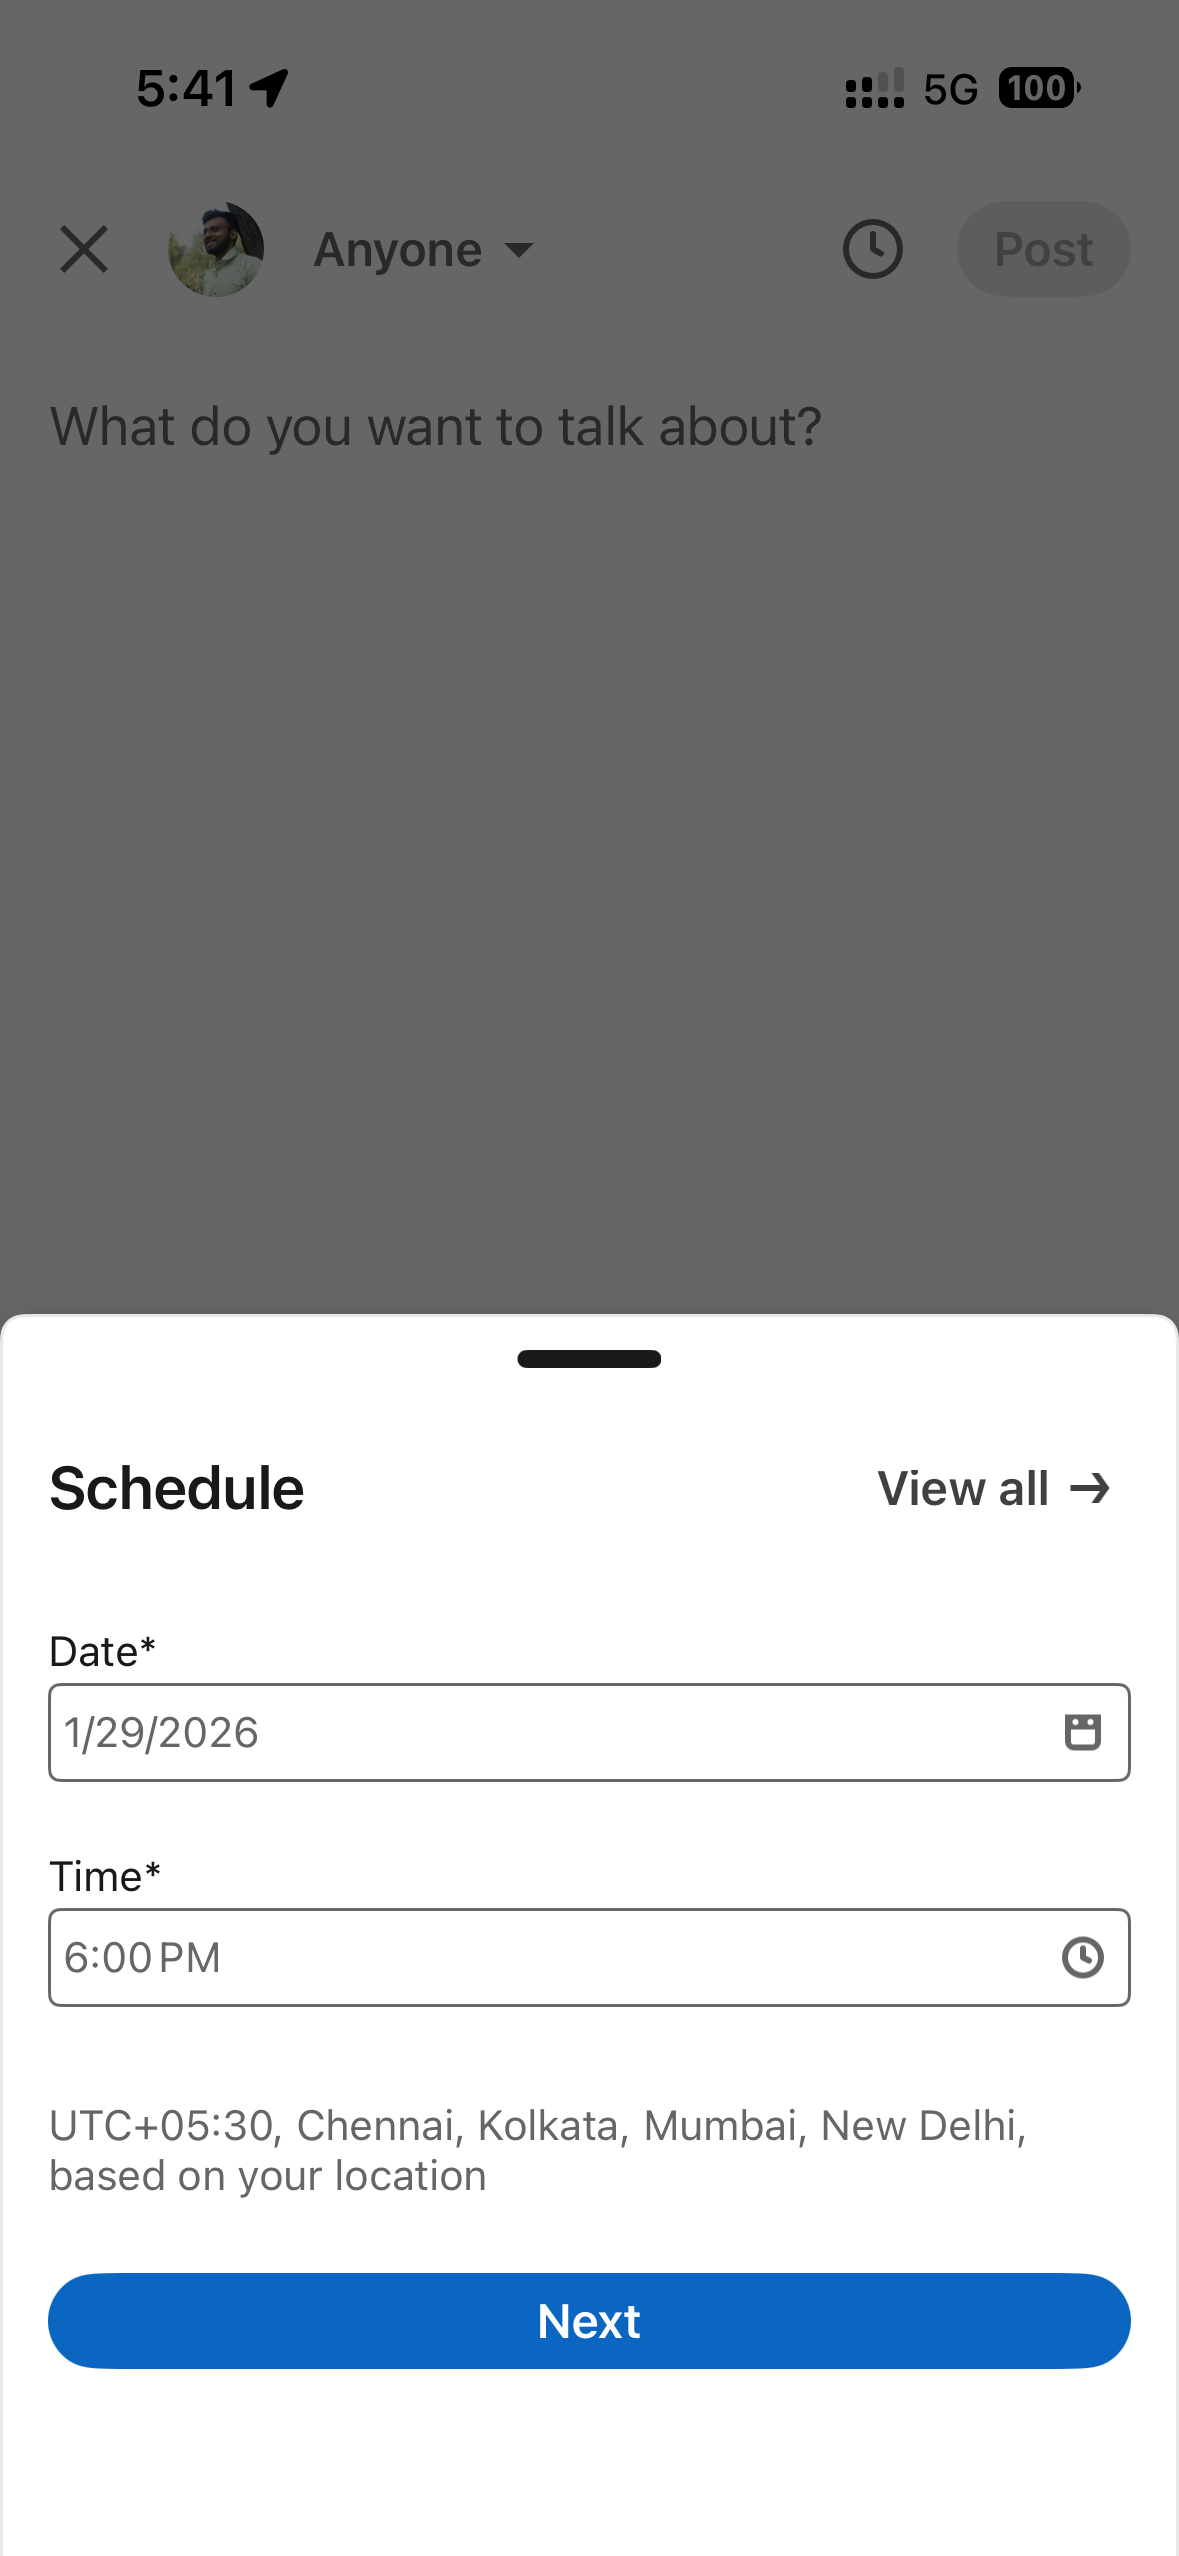
Step 4: Select Date and Time
Choose your desired publishing date and time. The same rules apply:
- Schedule between 10 minutes to 3 months ahead
- Use 30-minute increments or enter exact time
- Time is standardized in UTC based on your location
Step 5: Tap Next
Tap "Next" to confirm your selection. The scheduled time will display above your post.
Step 6: Tap Schedule
Tap "Schedule" in the upper-right corner. You'll see a confirmation pop-up indicating your post is scheduled.
How to View and Manage Your Scheduled Posts
Want to see all your scheduled posts or make changes? Here's how:
Viewing Your Scheduled Posts
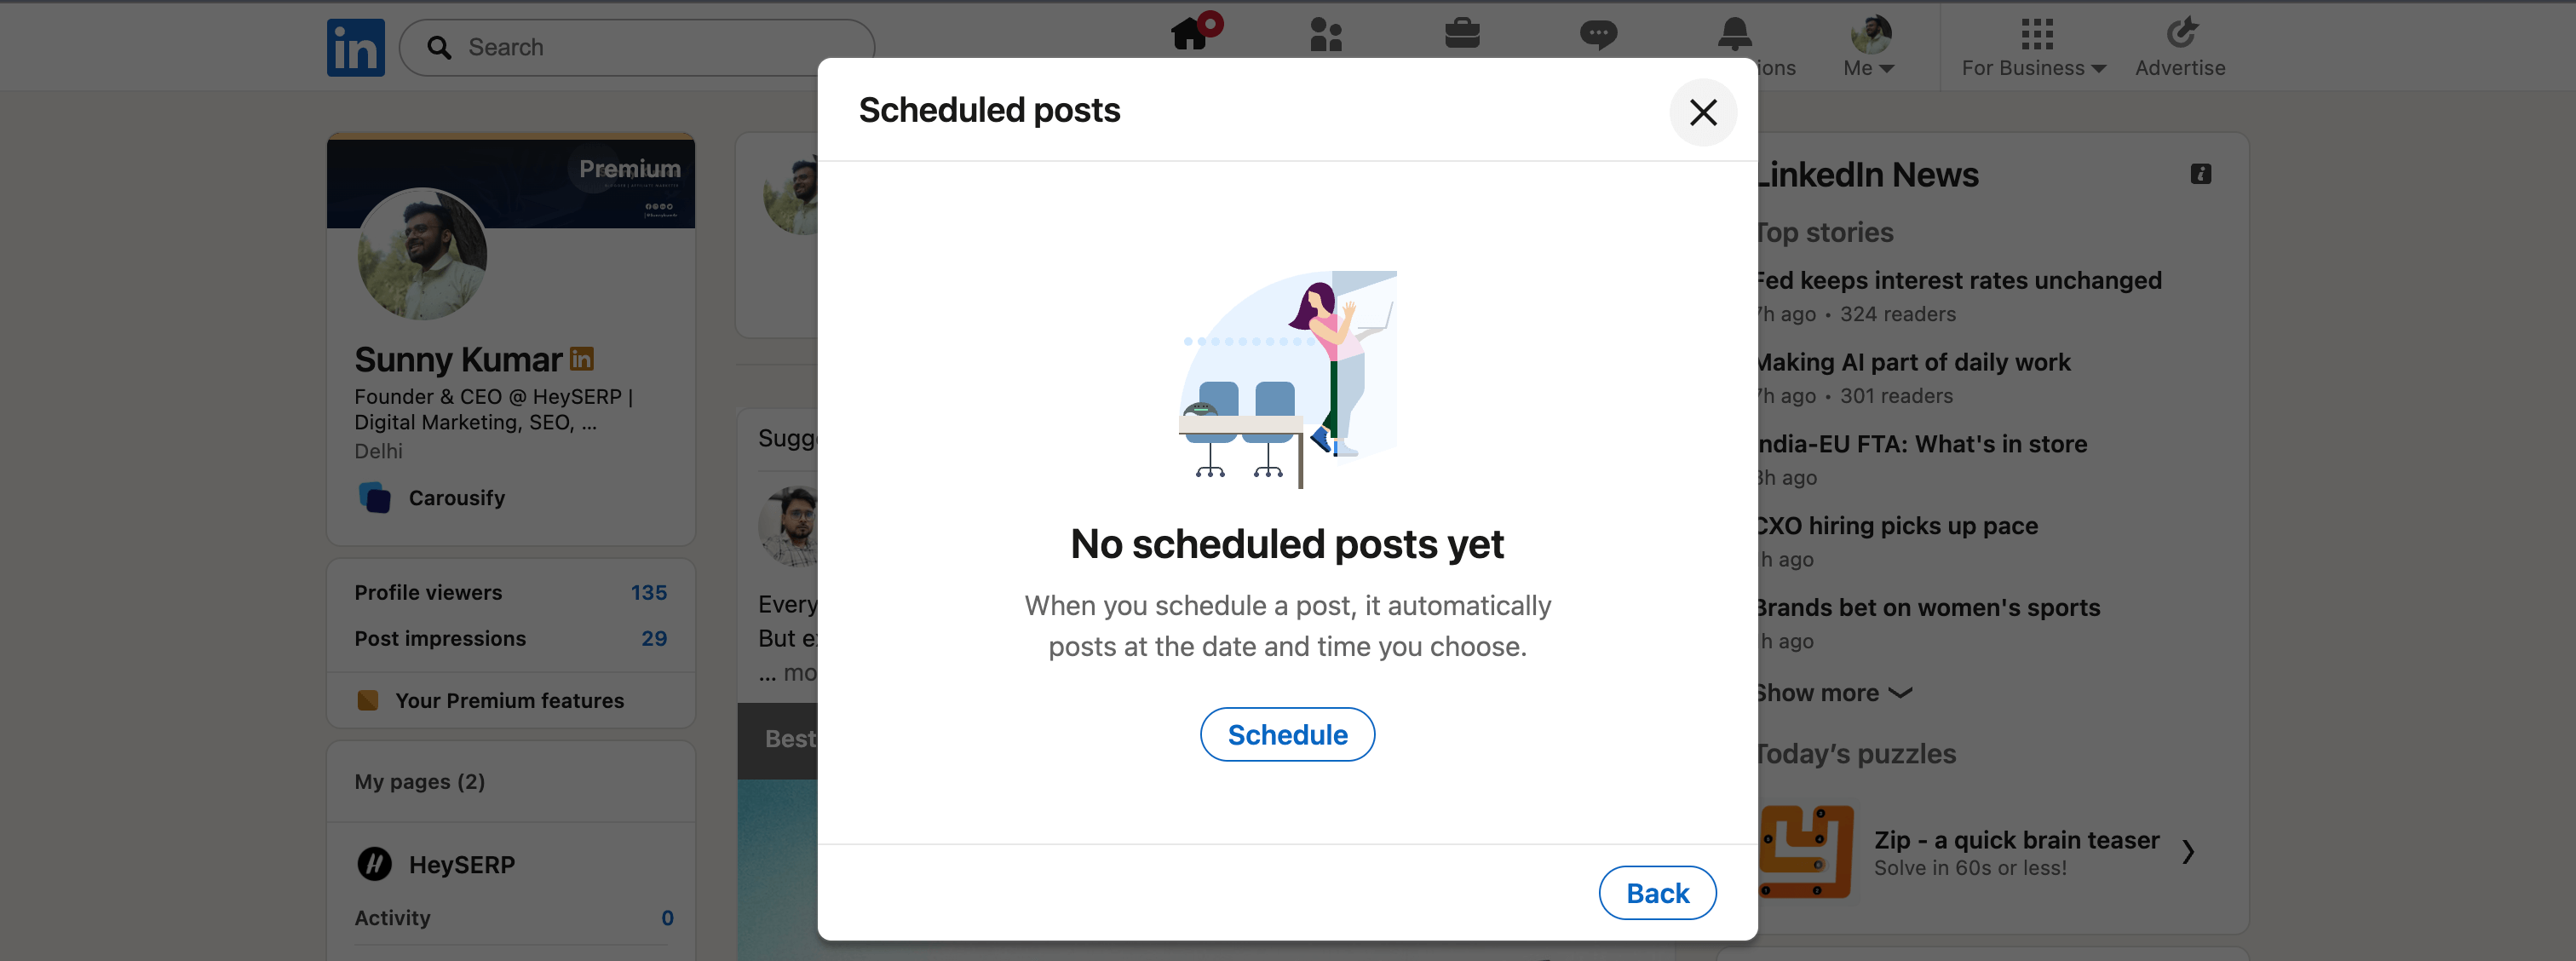
On Desktop:
- Click "Start a post" at the top of your homepage
- Click the 🕐 Clock icon in the lower-left corner
- Select "View all scheduled posts"
On Mobile:
- Tap the "Post" button in the navigation bar
- Tap the 🕐 Clock icon
- Tap "View all"
You'll see a preview of all your scheduled posts with their publish dates and times.
Editing Scheduled Posts
From the scheduled posts view, you can:
- Preview any scheduled post by clicking/tapping on it
- Edit the post content using the More icon (⋯) → Edit post
- Reschedule by selecting More icon → Modify schedule
- Delete a scheduled post using the Delete icon
Pro tip: I review my scheduled posts every Monday morning to make sure they're still relevant and timely. Sometimes industry news changes, and you'll want to update your content accordingly!
What You Can't Schedule on LinkedIn (Important Limitations!)
Before you get too excited, there are some limitations to LinkedIn's native scheduling feature.
You CANNOT schedule:
- ❌ Events – Event posts must be published immediately
- ❌ Jobs – Job postings don't support scheduling
- ❌ Services – Service listings must be posted right away
If you try to add any of these to a scheduled post, LinkedIn will show an error message. You'll need to either:
- Clear the scheduled date/time and post immediately
- Remove the unsupported content type from your post
Why these limitations? LinkedIn treats Events, Jobs, and Services as time-sensitive content that requires immediate publication. It's frustrating, but it makes sense from their perspective.
Best Practices for Scheduling LinkedIn Posts
After scheduling hundreds of posts over the past few years, here are some tips I've learned the hard way:
1. Post During Peak Engagement Hours
Research shows that LinkedIn engagement peaks during:
- Tuesday to Thursday (highest engagement days)
- 7-9 AM (morning commute and coffee time)
- 12-1 PM (lunch break scrolling)
- 5-6 PM (end of workday)
Schedule your posts during these windows for maximum visibility!
2. Don't Schedule Too Far in Advance
While LinkedIn lets you schedule up to 3 months ahead, I recommend staying within 2-4 weeks. Industry trends change fast, and you don't want outdated content publishing automatically.
3. Batch Create Content
Set aside time once a week to create multiple posts. I usually spend Sunday afternoon writing 5-7 posts for the upcoming week. This saves mental energy and ensures consistency.
4. Review Before Publishing
Always double-check your scheduled posts a day before they go live. Make sure:
- Links still work
- Content is still relevant
- No typos or formatting issues
- Images display correctly
5. Mix Scheduled and Real-Time Posts
Don't schedule everything! Leave room for spontaneous posts about breaking news, trending topics, or timely industry updates. The best LinkedIn strategy combines planned content with real-time engagement.
The Easier Way: Use Carousify for Advanced Scheduling
Now, if you want to skip the manual work and take your LinkedIn game to the next level, Carousify has got you covered.
While LinkedIn's native scheduling is great for basic posts, Carousify offers a complete content creation and scheduling suite designed specifically for LinkedIn creators who want to grow faster.
Why Carousify is Better Than Native Scheduling
| Feature | LinkedIn Native | Carousify |
|---|---|---|
| Post Scheduling | ✅ Basic scheduling | ✅ Advanced scheduling with analytics |
| Carousel Creation | ❌ Manual design needed | ✅ Hundreds of templates |
| Content Generation | ❌ Write everything yourself | ✅ AI-powered post generator |
| Analytics | ❌ Basic LinkedIn stats | ✅ Detailed performance tracking |
| PDF to Post | ❌ Not available | ✅ Convert PDFs instantly |
| YouTube to Post | ❌ Not available | ✅ Convert videos to posts |
Carousify Features for Transforming Your LinkedIn Presence
Post Scheduling
Schedule your posts and carousels seamlessly so they publish at the best time to boost your reach and engagement. Unlike LinkedIn's basic scheduler, Carousify shows you optimal posting times based on your audience's activity patterns.
Post Generator
Beat writer's block! Create trendy, engaging content without hours of research. Just input your topic, and Carousify generates professional posts that match your voice and style.
Carousel Builder
Choose from hundreds of pre-defined templates to create eye-catching carousels with an interactive builder. Carousels get 3x more engagement than regular posts, and Carousify makes them effortless to create.
PDF to LinkedIn Post
Turn any PDF you've just finished reading into a polished LinkedIn post in seconds. Perfect for sharing insights from whitepapers, reports, or ebooks.
YouTube to LinkedIn Post
Convert videos into LinkedIn posts and carousels with just a few clicks. Repurpose your video content without starting from scratch!
Detailed Analytics
Track performance, engagement, and CTRs to optimize your personal brand. See what's working, what's not, and adjust your strategy accordingly.
Why I Recommend Carousify
Here's the thing – LinkedIn's native scheduling is fine for beginners. But if you're serious about growing your personal brand, you need tools that save time AND improve results.
And Carousify does both.
Instead of spending hours creating content and manually scheduling posts, with Carousify, you can batch-create beautiful carousels, generate engaging posts, and schedule everything in one platform.
👉 Try Carousify today and see the difference!
Common Mistakes to Avoid When Scheduling Posts
Let me share some mistakes I made when I first started scheduling posts (so you don't have to!):
Mistake 1: Scheduling Without Testing
- Wrong: Schedule a post and forget about it.
- Right: Always preview your post before scheduling. Check formatting, links, and images to make sure everything looks perfect.
Mistake 2: Ignoring Time Zones
- Wrong: Scheduling at 9 AM your time when your audience is in a different time zone.
- Right: Know where your audience is located and schedule accordingly. If most of your connections are in New York and you're in California, schedule for East Coast hours!
Mistake 3: Over-Scheduling
- Wrong: Scheduling 5 posts per day because "more is better."
- Right: Quality over quantity! 3-5 high-quality posts per week beats 20 mediocre ones. Over-posting can actually hurt your engagement.
Mistake 4: Not Engaging After Publishing
- Wrong: Schedule a post and disappear.
- Right: Be online when your post goes live! Respond to comments quickly to boost engagement and signal to LinkedIn's algorithm that your post is worth showing to more people.
Mistake 5: Scheduling Outdated Content
- Wrong: Scheduling posts months in advance and never reviewing them.
- Right: Review scheduled posts weekly. Delete or reschedule anything that's no longer relevant or timely.
Summing Up!
Scheduling posts on LinkedIn is one of the easiest and most effective ways to grow your presence on the platform. I suggest starting with LinkedIn’s own scheduling feature, and nce you get comfortable using it, then use professional LinkedIn scheduling tools like Carousify for scheduling with better analytics and additional features.
Now go ahead, plan that content, and watch your engagement soar! 🚀
Happy scheduling, and may your LinkedIn posts always hit peak engagement hours!